Setup Instructions
Ultimate Ridgehooks have been designed and built to provide you with a lifetime of use. Follow the setup guide, and the UR system will take only a few minutes to attach to your 2x8s and go to work for you.
Download the step by step set up guide PDF or an exploded view of the assembly.
Watch an informational video
Setup guide:
You will need wood "legs" of some sort long enough to provide a nailing base to attach or build your staging where you want it. We found 2x8s ideal for chimney bracket–type staging; just slightly wider than the nailing pads and thick enough to clear ridge vents.
Tools needed:
- Drill
- 3/8" bit
- Handsaw or circular saw
Other materials needed:
- 2 lengths of 2"x8" framing lumber per assembly (see tips)
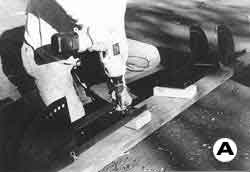
Place the end of the curved piece on the end of your piece of wood so they are in a straight line and that the curved piece overlaps at least 7". Using the holes in the curved piece as a guide, drill 3/8" holes through the wood (see photo A) and attach the two using the 3/8" x 2" bolts provided, nut side up (photo A).
Repeat with the other curved piece and the 2 straight pieces. If you will be placing staging only on one side of the roof, you only need 6"-length wood "pads" attached to the straight pieces to keep UR off the ridge vent and allow them to fit on a roof that doesn't match the angle provided by the adjustment holes.
.jpg)
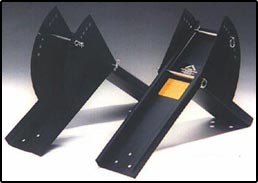
Assemble the straight and curved pieces by sliding a fastpin through the units as shown in diagram. Insert the adjustment pin in any hole to stabilize the assembly for carrying to the roof ridge.
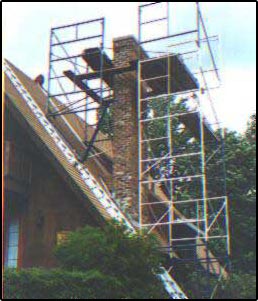
Using a ladder and ridge hook, bring the assembly up to the roof ridge (photo B). If necessary, remove the adjustment pin and reset to match the roof pitch.
Note: For roof pitches that don't coincide with UR, use the next "steeper" hole. If you have "legs" on both sides, slightly loosen the nuts to allow the "legs" to lie flat on the roof.
For roof-peak chimneys
For setting chimney brackets on roofs with "peak" chimneys, place UR and legs on roof. Attach brackets to the 7½' 2x8 legs on one side of the roof (see photo B). This will give you a big enough (5' x 7') platform for 2 men, mortar pan, and brick. Erect a set of staging for added safety, and the ability to put the mortar pan and masonry units at a good working height. Attach 2' "legs" on the other side for roof brackets and a plank so that you can step over to sight plumb and set brick on the "back" side. (OSHA: All platforms should be 18" wide minimum, have guardrails, midrails, and toeboards. Scaffolds must be used in accordance with all local, state, and federal OSHA laws and codes.)
For off-peak chimneys:
When using chimney brackets to stage "off-peak chimneys," you can attach the bracket anywhere along the 7½' 2x8 so that it is holding all the staging by the top nailing pad. Put another 2x length under the bracket bottom, and secure it from slipping out until there's weight on it.
2x8 tips:

Exploded view of UR
parts with user-provided 2x8's
Start with two 10-footers. On each one, cut off a 6" length for "pads" and a 24" length off each one. That will leave a 7½-foot length. These lengths will work for all but those chimneys that are too far from the ridge for the 7½-footers to be under the upper nailing feet of the chimney brackets. (If you ever need a longer reach, get 2 more 2x8s long enough to reach under both nailing tabs of chimney brackets. You will then have a pair of lengths that will stage another 4 feet from the ridge on a future job)
You can countersink the carriage bolt holes with a chisel or simply soak the drilled holes in water overnight. The wood will then be soft enough to compress so that when you tighten the bolt with a socket wrench, you can suck the bolt head down flush.
*Note: Please follow these instructions! The makers of Ultimate Ridgehooks will not accept responsibility for roof damage done due to inadequate padding.